Wednesday, January 27, 2016

Zipper Pouch


I made a little pouch with a zipper. I thought it might be a great place to store knitting notions such as darning needles, stitch markers, etc. I know I have gobs of stitch markers and darning needles but they seem to have gravitated to other project bags. So a special case to keep things in one spot would be a really good idea for me. 


This pouch matches a draw string bag I made not too long ago. 


The pattern I followed is on www.craftsy.com and is called "The Night Before School Starts Pencil Case". I struggled a bit with the zipper. I think this may have been the first zipper I've sewn in since 1986. Seriously. 

This pouch is pretty small. It would easily made larger for more storage. 


Tuesday, January 26, 2016

Knitting Project Bags


Snoopy lined with red batik fabric. 


Barnyard fabric with a peachy yellow lining. 


Knitting Sheep lined with a great red print. Looks as if there is white yarn all over the red fabric. 


I've been sewing up a storm. I am enjoying making these drawstring bags. They are great for storing small knitting projects such as socks and hats. I am experimenting with various lining materials to give the bags a little structure. So far I've used quilt batting, featherweight iron on interfacing, and medium weight iron on interfacing. Personally the bag I like best is a bag I made with no extra lining material. 

Here it is.   


This one is lined with a pretty blue batik fabric. 

I especially like how the bottom of this bag turned out. 


Sunday, January 24, 2016

Rainbow Fish Socks


This is what I am focusing on this week. 
Previously I was calling this project my "Funfetti Socks". I thought the yarn looked like Funfetti Cake. 


Now I am calling these socks my "Rainbow Fish" socks. The colors remind me of the illustrations in a children's book. 


I found a tutorial on line the other day. I used this technique and it really helped prevent holes in the gusset, which seems to frequently be a problem. Here is the video link:


Wednesday, January 20, 2016

Socks in a Flash


Hot off the needles!  I finished this pair of socks in just under a week. I am loving knitting socks two at a time on one long needle (Magic Loop) and the Fleegle Heel is the best. 

I keep thinking the Fleegle Heel should work in cuff down socks. I need to read up on that a bit more. 

Tuesday, January 19, 2016

Another Pair of Toe Up Socks


I am madly knitting another pair of two at a time, toe up socks. This time I am using Diversity yarn by Plymouth Yarns. 
The color way is bizarre. I was knitting these during some NFL playoff games so I kept calling these socks my "Denver Broncos vs Detroit Lions" socks since the colors in the yarn remind me of those teams. 


I wound this yarn into two balls a LONG time ago. I think I was going for stripes going in opposite directions. Last week, when I cast on these socks, I just cast on. I did not care about the socks matching. I just wanted to make a better fitting pair of toe up socks. The last pair was a bit long since I stared the heel a bit too late. 


The pattern I have for toe up socks was not well written so I found myself reading Fleegle's blog to better understand the Fleegle Heel. 


The heel is amazing. I am attaching some helpful links so I can keep them all in one spot. If you want to try out toe up socks with a Fleegle heel, maybe you'll find these links helpful as well. 

Judy's Magic Cast On:


Fleegle's Heel:


Fleegle provided additional information to ensure there are no holes in the heel: 


Jeny's Surprisingly Stretchy Bind Off:

Needle Felting


Needle Felting Class (from left to right): Trudy, me, Belinda, Pam, Karen, and Nancy)

I took a needle felting class before Christmas.  I probably would not have signed up for the class, but Belinda wanted to take the class and I do enjoy taking classes for the socializing. I just did not want to invest in a new hobby.  The class was such that we paid one price and all the supplies were included; that being the case, I decided to take the class.  I am glad I took the class.  It was a really good time and the ladies in the class are some of my very favorite people I've met through the knit shop. The class instructor, Sherry, is a gal I've know for over 23 years so that was a perk, too.  Sherry must have taken the photo since she's absent from the class photo!

We had a fun time making needle felted angels.  My needle felting skills could use some serious improvement but it was fun to try out this process.  You can't see the details very well but the angel has a halo and a metallic thread belt.  We used different type of sheep fibers for the body, hair, wings, and cape. 

I loved the curly fibers we used for the wings. We sprayed wings with lots of hairspray to help them to keep their shape.


Here's my angel hanging in my messy craft room.


Monday, January 18, 2016

Leftover Sock Yarn Cowl


My friend, Belinda, and I decided to make this project together and I am glad we did. Belinda and I went to the Interweave Yarn Fest in Loveland, Colorado, last year.  In one booth (Canon Hand Dyes) we found this great looking infinity cowl knit up.  The cowl used lots of mini-skeins of different sock yarns and black sock yarn called "Canon Hand Dyes Charles Sock".  In the booth, you could purchase the minis-skeins and the black yarn to make the project.  I remember doing some figuring and the project would have cost us at least $75.00 if we bought all of the supplies in this one booth.  I pulled Belinda aside and we figured we could get the black yarn in the booth, but then share our scrap yarn left over from our sock knitting, and together we'd have enough to make the cowls. 

We cast on our cowls when we went to our knitting retreat in Cucharra, Colorado, back in October, and we've both been working on them.  Belinda showed me her shorter version of the cowl last weekend; she decided to stop when her cowl reached about 34 inches.  I was not that far along in the project, so I steamed ahead to catch up with her.  I grafted both ends together so the loop is complete and I love my colorful cowl.  The cowl was knit in the round, so the cowl is both a tube and a loop. 


I love looking at the various colorful stripes. The cowl is like a walk down memory lane.... socks from my past.   


Here is the pattern for this cowl.  It's fun to look at the various cowls people have knit using this pattern:

http://www.ravelry.com/patterns/library/striped-cowl-2

Belinda and I think we have enough yarn to make another one of these cowls.  We definitely have enough left over bits of sock yarn.

Sunday, January 17, 2016

Building Blocks: Block #10


Wow, I really love the look of Building Block #10.  I raced through this block. Racing to the finish. Only two more blocks to go!

This great looking block looks like fancy cables but the design is created from yarn overs and slip, slip, knit (SSK) stitches. Sometimes when I make a block like this for an afghan, I am so in love with the look of the block that I think it would be nice to make an entire blanket out of the design.  Just cast on a greater number of stitches and have more pattern repeats within the body of the blanket.   This would make a gorgeous blanket.

Saturday, January 16, 2016

Building Blocks: Block #9


I finished up Building Block #9 last week but just finally blocked it yesterday.

I love this checkerboard look of this block.

Some squares of the checkerboard are created by purl stitches on the right side of the block. The pattern designer got fancy with the other squares. She included left twists which give the appearance of left-leaning diagonal lines in the other checkerboard squares. I wish my left twists were a little more tidy looking.  A left twist stitch is worked over two stitches: skip the first stitch, knit into the back of the stitch of the second stitch but leave it on the left needle, then knit the first stitch into the front of the stitch, and then move both stitches to the right needle.

I love that in Michelle Hunter's patterns she incorporates a lot of twisted stitches. You get the appearance of cable stitches without having to trouble with a cable needle. 

I did have my very first Building Blocks Afghan Class last week.  We had a snow storm that day, so I few ladies were unable to attend. I will be having a "make up" class today.  I have completed Block #10, so I'll post about that very soon.

Friday, January 15, 2016

Three New Techniques in ONE Pair of Socks


Two at a Time Toe Up Socks with a Fleegle Heel


I took a class to make these socks a few months back. I was unhappy with these socks because the yarn is scrawny and the needles I used were too big. The combination created loose, messy/stretched out looking knitting when I put the socks on my feet.   The photos above are pictures I snapped and sent to the class instructor. I kept asking, "should I start the heel yet?"  Kind of like "are we there yet?"  Ha, ha!


I liked that I added some mock cables to the socks. I also liked that I learned toe up cast on called "Judy's Magic Cast On". 


I liked knitting the Fleegle Heel. 


I liked that I learned a new bind off called "Jenny's Surprisingly Stretchy Bind Off".


I was going to frog these socks and I tried them on one last time before I did. The socks are a tad long (I started the heel a bit too late) and, like I said, I was unhappy with the yarn/needle combination.  It occurred to me I could just knit about a dozen rows of k1 p1 ribbing and I would have the opportunity to try out the new bind off technique and I would have a nice short pair of socks.  So that's what I did.  I am happy I finished these socks.  They do slip around on my feet when I walk around in the house, but I am done with the project and on to the next thing...


Sunday, January 3, 2016

A Rather Sweet Christmas Story


I think this is a rather sweet Christmas story, just a week or so late.

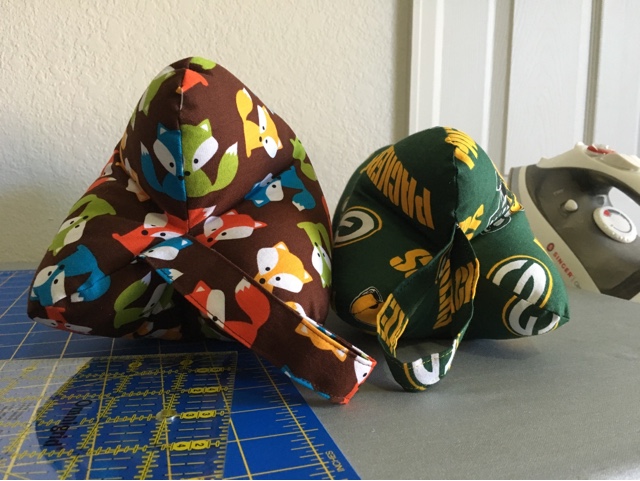
A young mother wrote to me on Etsy back in November.  She asked if I could make a child, mini-sized dog bone pillow.  She went on to say that her two year old son carried her big dog bone pillow EVERYWHERE.  She wanted to the pillow to have Mickey and Minnie Mouse on it so she found some fabric she liked on-line and I purchased it for her custom order.  I was so excited to make a  mini-dog bone shaped pillow that I made up a prototype right away.  Above, you can see a smaller green (Green Bay Packers) pillow along side a normal size dog bone shaped pillow (brown with foxes).  The green pillow was still too long so I sent out to make another prototype.


The second pillow in red and white above (University of Oklahoma), was just right.  When the Mickey and Minnie fabric arrived, I made up a little pillow for the little boy. Sweet!


Right around the time I mailed off the mini-pillow, I got a custom order request from a man.  He asked rather cryptically,

I have a question. Are you able to take a shirt and sew it to a pattern before stitching together? I'll explain in next message.

In the next message, the man went on to identify himself as the husband of the young mother who had ordered the Mickey and Minnie pillow from me a few weeks back.  Then he said,

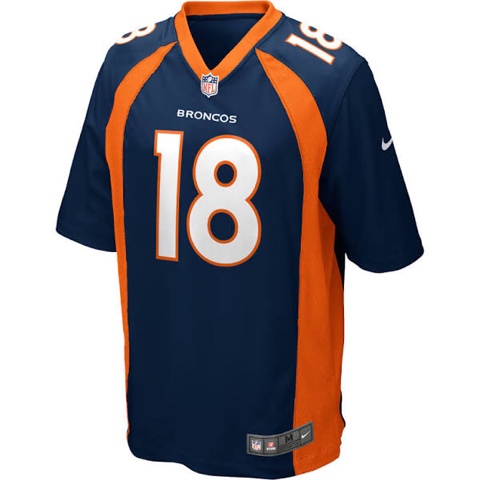
I have a shirt that when we first got together I had to spray with Cologne for her to sleep when I left to go back home and would like to have a bone pillow made out of it if possible. It's a jersey shirt.

Wow, what a guy.  What a thoughtful and romantic gift idea for his wife!
So me mailed me the shirt.


And I made a pillow. I noticed the shirt had some sort of embroidered brand label on the lower corner of the shirt front so I asked if I should use that in the shirt and he said yes. He said there was a snag in the fabric on the front of the shirt as well and asked that I try to include that in the pillow if I could.  Apparently, the snag has some sentimental value as well.  I lined the pillow with a layer of white broadcloth fabric to give the pillow more structure, otherwise the jersey fabric would have been too stretchy to stuff and the pillow would have been lumpy.


I really liked how the pillow turned out.  You can see I used the embroidered label on the pillow's strap/handle. I have to tell you this pillow was a real challenge; working with the stretchy jersey fabric was difficult.  Plus I was just a bit nervous since I did not want to ruin this shirt that had a lot of sentimental value to such a sweet, sweet couple.


Before Christmas, I got a nice note from the young mom. She sent a photo of her son smiling and lying down with his Mickey and Minnie pillow. She said he really loves it  She said she just couldn't wait to give him the pillow so she gave it to him right away, instead of waiting until Christmas. 

I have not heard back from the couple since I mailed off the pillow made with the jersey shirt.  I like to imagine that the husband gift wrapped the gift nicely for his wife and she opened it Christmas morning or maybe Christmas Eve.  And that she loved it and appreciated the romantic and thoughtful gift her husband had made especially for her. 

... and may they live happily every after...


Saturday, January 2, 2016

Building Blocks: Block #8


Yowza. I struggled to stay motivated to finish this block. I started this weeks ago!  


After starting the block and knitting the for awhile, I worried the block seemed too tight. I think slipped stitches, which are the little horizontal dashes you see which create a zig zag design, make the knitting pull and tug some. I had to tell myself I couldn't work on any "just for fun" sewing projects until I finished this block!  I powered through and, thankfully some of the pulling and tugging in the knitting which was driving me nuts, sorted itself out when I blocked the square. I am now madly working on block #9 and will try to finish it today.  My Building Blocks Afghan Classes start on January 8th, which is just around the corner.  It looks as if I have 10 ladies signed up for the class; there will be a session in the a.m. with 6 ladies and then the p.m. session will have 4 ladies. Fridays are going to be Fun-days!