Sunday, July 21, 2013

Oops! Super Short Socks


At JoAnn's Fabrics several weeks ago, I got some Serenity Sock Weight Yarn (by Premiere Yarns) in a colorway called "Harlequin".  It's a self-striping yarn in shades of teal green, dark purple, lime green, and dark yellow. I love the yarn because it's so soft but it turns out it is hand wash/lay flat to dry.  I do need to read the labels better.  Drat!

My coworker, Mrs. W, loves purple so I thought, "Socks for Christmas this year!" I was so proud of myself to be thinking of her Christmas gift already. 

Sat down to cast on the socks about a week ago and, for the life of me, I could not find a pattern repeat in the two balls of yarn I had. I kept looking back and forth between the two balls of yarn and one looked drastically darker than the other. Checked the dye lots.

Doh! 

The dye lots!!! They did not match.  I really do need to read the labels better.  Double drat!!

So I decided to make a pair of very short ankle socks to see if I can make a pair of socks out of one 50 gram yarn ball.  Turns out I had some left over teal green yarn from Knit Picks and I am using the teal green for the heals and toes of the socks.  The solid teal green yarn matches the "Harlequin" self-striping yarn really, really well. I used the teal green yarn in a shawl awhile back. Click HERE to see the shawl called "Calais".

Since the last pair of socks I made with the Serenity Sock Weight Yarn turned out too large (see my "Moab at Dusk" socks), this time I cast on 56 stitches on size 2.75 mm double pointed needles (instead of 64 stitches on size 2.75 mm double pointed needles). These are shaping up to be a good fit for my big ol' feet.

Friday, July 19, 2013

Sewing... more pillows.


A little time for a little sewing...

I actually had these three pillows all stitched up nearly two months ago but just got around to carefully stitching up the opening used for stuffing.  I am especially fond of the pillow above.   I pieced the fabric together using a "log cabin" quilt pattern. Originally I was going to make a placemat with the log cabin design when I pieced it together years ago, but recently decided to turn it into a one of a kind extra special dog bone shaped, contoured neck pillow. 


I made these pillows for my Etsy Shop called "Kimzkraftkorner". 

Moab at Dusk Socks


I rambled on and on about these socks several weeks ago in THIS POST.  The yarn is called "Chili" and, as I knit these socks, I just could not get over the fact that the colors in the yarn looked nothing like any kind of "Chili" I know.

I renamed the yarn "Moab at Dusk".  By the way, I am expecting a phone call from Premier Yarns any day now as I am certain they will want to hire me when I retire in October 2015, to be their Go-to-Girl in Charge of Yarn Naming.  Ha, ha!

The socks were knit on my favorite needles (I have two sets of 2.75 mm needles and I like to make my stripey-stripey socks very matchey-matchey so using two sets of dpns to knit the socks two at a time on two sets of needles works for me).  Was that a run on sentence?  Phew, I am out of breath!

Turns out these socks are a little too big for me.  Some day I will accept that 2.75 mm needles and 64 stitches per round just doesn't work for me.  And 2.25 mm needles with 64 stitches also just doesn't work for me.  But you see, my 2.50 mm needles are tied up in ANOTHER pair of socks. Perhaps the Universe is trying to tell me to finish THAT pair of socks so I can rescue the needles?  Or perhaps the Universe is telling me to buy more sock needles?

Wouldn't you know, as I was finishing up these socks and sort of kicking myself for making them too large, an email popped up from someone dear to me.  She's told me a time or two that she's been having some swelling in her ankles and many of her socks are too tight and uncomfortable.  I thought to myself, "Hey, she could use a pair of loose fitting socks!"  And her birthday is in August.  Perfect!  I love it when the Universe speaks to me. 


Haven't been finding much time to knit lately. Going for lots of walks with our puppy, Sandy.  It feels great to be getting out more in the nice weather. 

Wednesday, July 3, 2013

Crackling Pillow Dog Toy for Sandy


 In May 2013, we travelled about four hours from our house to pick out a dog in Granby, Colorado.  We went there to meet the Australian Labradoodle breeder, her dogs, and her puppies. We picked out Sandy but could not bring her home for about a month since she had to stay with her mom dog, Matessa, for about 8 weeks.  (By the way, the dad dog is named Tennison... can't leave him out).


While we were waiting to bring Sandy home, I looked on line for pet toys one can make at home.  I came across this fun article:  "Ten DIY Dog Toys You Can Make for Pennies" and sort of stored some of these ideas in my head.  The one project that really stood out to me was "#9 Crackling Sock":  put an empty plastic water bottle (lid removed/choking hazard) in an old sock and tie a knot to keep the bottle from coming out of the sock.  Apparently dogs like to crunch and munch on Crackling Socks.

Fast-forward a few weeks, I opened my Etsy Shop and was looking at dog toys available for sale.  I found a seller making and selling essentially the same thing only, in place of the sock, the seller made a nice fleece pillowcase with a Velcro (hook and loop) closure.  I have fleece and I have plastic water bottles. I went to WalMart and spent about $0.84 on generic Velcro (hook and loop).  Turns out I already had Velcro at home.  Drat! 

My first prototype was a learning experience but not an epic failure (I was sleepy from getting up early with puppy after all).  When I turned the pillowcase inside out, the Velcro (hook and loop) was facing the wrong way! Doh!!!  No worries though.  I made the opening to insert and remove the water bottle so small that there is no chance the water bottle will fall out.  The prototype was a little longer than it needed to be, so after making a few sizing and procedural adjustments, I was on a roll.  It was like I had a little assembly line in my craft room (which reminds me... I have a craft room now... I need to take some photos so you can see that).

Homemade Crackling Pillow Dog Toy

To make this project, you will need:
  • 1 plastic water bottle
  • fleece (I used two contrasting colors)
  • Velcro (hook and loop)
  • sewing machine and thread
  • scissors
  • straight pins
Description:  Essentially, you are making a fleece pillowcase with a Velcro (hook and loop closure).  The Velcro is attached to two fleece rectangles toward one end of the rectangle to make it easier to insert or remove an empty, crunchy water bottle.  What makes this project great is that the water bottle can be replaced if it get damaged/deteoriates/needs to be replaced.  Also, the empty fleece pillowcase can be easily laundered in the washer and dryer when it becomes soiled.

Instructions:

Cut the fabric (fleece) into two rectangles which measure approximately 6 x 11 inches.  For cutting I used my "pizza cutter like" rotary cutter on a self-healing mat but scissors will do. 


Next, attach a little Velcro (hook and loop) to each rectangle.  Be sure you use the "hook" side of the Velcro on one rectangle and the "loop" side of the Velcro on the other rectangle.  I used about 3 inches of Velcro on each rectangle.  When you stitch the Velcro down, you need to ensure the Velcro is positioned on the rectangles such that rectangles are "mirror images" (see photo).  Also, my fleece did not really have a "right" or "wrong" side, but if you make this project and your fabric has a distinct "right side", stitch the Velcro (hook and loop) to the "right side" of the fabric.  Using a sewing machine, stitch the Velcro down by stitching around the perimeter of the Velcro (use straight pins to hold in position).  I used a straight stitch when attaching the Velcro but I imagine a zig-zag stitch would also work nicely.  You'll notice that the Velcro is positioned toward the top of the rectangles (about 2 inches from the top).  It's a good spot to put the opening so you can insert the plastic water bottle when the project is complete.  If you put the Velcro in the center of the rectangle, inserting the bottle would be difficult.


After you get the Velcro stitched down, place the two rectangles together (right sides together).  The Velcro should marry/line up and hold together as Velcro does.   Next, pin the rectangles together to keep them from shifting while sewing.  Using a straight stitch on the sewing machine, sew around the perimeter of the pillowcase, leaving an opening to insert and remove the water bottle.

 
You'll notice that on three sides of the pillow case, I stitched closely to the edge of the pillowcase(about  1/4 to 1/2 inch from the edge), but on the Velcro side of the pillow case, I stitched about 3/4 inch from the edge.  Basically, on the Velcro side you want the stitching to line up with where the Velcro is stitched down as is shown in the photo above.  You also noticed I started stitching about 1/2 inch after the place where the Velcro is stitched down and I stopped stitching about 1/2 inch before I got to the Velcro. My Velcro strip is about 3 inches long so this gave me a 4 inch opening which is a good size to insert the plastic water bottle when the project is completed.


In this photo (above), I am pointing to the spot where I started sewing.  I started sewing about 1/2 inch down from the Velcro.  Stitch back and forth a few times when you first get going as this will be the opening for inserting and removing the bottle.  Stitching back and forth will keep the opening from tearing open or stretching out.


In this photo (above), I am pointing to where I stopped sewing. I stopped sewing about 1/2 inch before I got to the Velcro.  Stitch back and forth here too to prevent the opening from tearing.  If you use a 3 inch strip of Velcro and leave about 1/2 inch space before and after the Velcro, you'll end up with a 4 inch opening... a good size for inserting the water bottle later on.


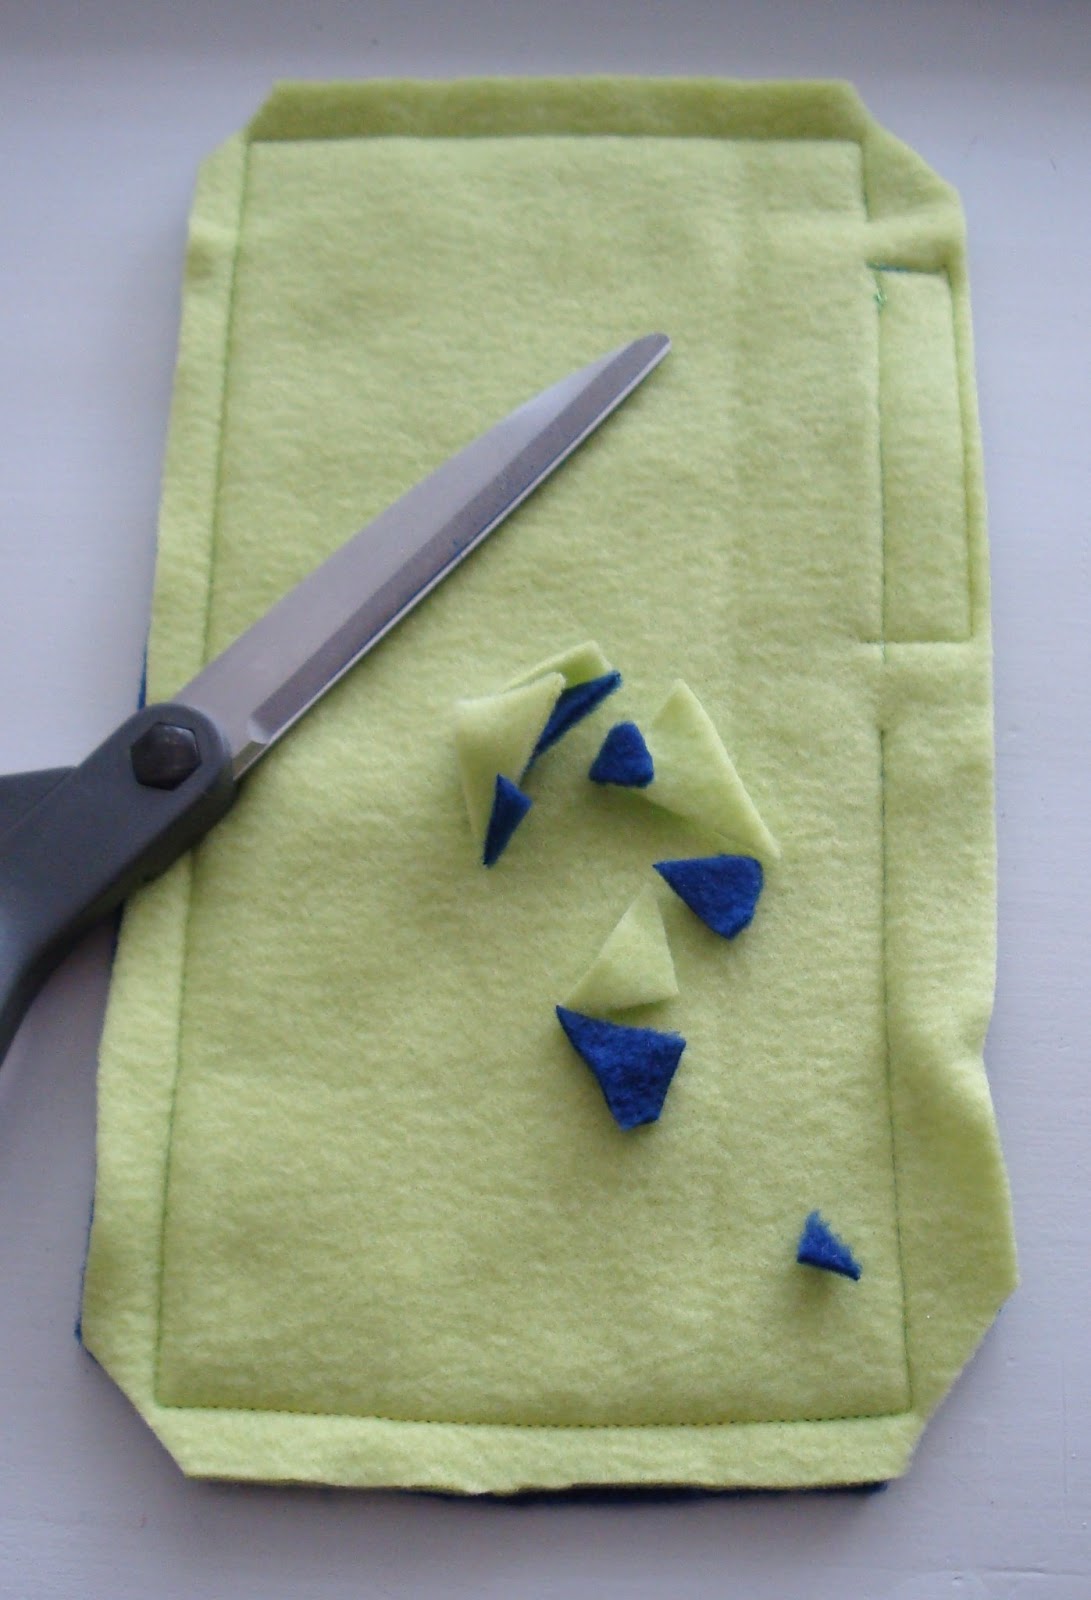
Clip the corners to remove some of the bulkiness and then turn the pillow inside out.


See, there's the Velcro closure to keep the pillow case sealed nicely.


Remove the lid (choking hazard) from a plastic water bottle (16.9 ounce size) and insert the bottle.


Ta-Dah!  A Crackling Pillow Dog Toy!

 
Now, go make a one or two more... or eight.  Great gift for my friends who also have four legged friends.


Of course... I'll have to save some for Sandy.


 This project is "Sandy Approved".


A Fleece Blanket for Zach and Sandy

 
One of the reasons we picked Sandy to join our family was that she is a non-shedding and considered to be a hypo-allergenic dog. We have lots of allergies in our family and our last dog (a Rottweiler) shed a TON.  Sandy appears to not shed and I am assuming she is hypo-allergenic as promised, but what we did not anticipate is that her hair hold allergens! She seems to be a little "dust mop" and the stuff in grass that makes one sneeze seems to cling to her.  I am hoping this will change as she gets taller and less of HER is so close to the ground. 

 
My son, Zach, loves to have Sandy lay on him or on the recliner with him, especially when she is mellow and napping.  Zach brings his fleece blanket from his bedroom to the living room every morning (ummm, remind you of any particular character from the comic strip "Peanuts"?)   I noticed Zach rubbing his eyes and sneezing a bit from the allergens, so I decided to make a fleece blanket for Zach and Sandy to keep in the living room for their snuggle time. That way, Zach can keep his other fleece blanket in his bedroom and keep some of the allergens at bay.

At WalMart, I found this cute black and white puppy paw print fleece and bought 2 1/2 yards for my tall boy.  I also found wide Quilt Binding in a dark, rich red. I think the two go together nicely.  I found three packages of the Quilt Binding and it turned out to not be enough to go all the way around the perimeter of the blanket (did I ever mention my math skills stink!?)  No worries though.  For the top and bottom of the blanket (the narrow ends), I folded the raw edge of the fabric down and stitched it on the sewing machine with red thread using a straight stitch.  I just folded the fabric over one time since fleece does not unravel.  For the long sides of the blanket, I pinned down the Quilt Binding and then stitched it down on the sewing machine using a zig-zag stitch.

Zach and Sandy are loving this blanket.  This project is "Zach Approved" and "Sandy Approved".

Tuesday, July 2, 2013

Vacation Socks


Hey, I actually finished something.  Actually I finished these a week or two ago but have been just tooooo busy to take a photo and post.

A pair of socks I am calling my "Vacation Socks":  I started them on Spring Break in March 2013 when we went to Moab, Utah, and then took them with me on a cruise in June 2013.  I think I knit on them just a bit on the plane rides between Denver, Colorado & Fort Lauderdale, Florida.  Nope, not a lot of knitting took place on the cruise ship. 

 
I finally finished these in mid-June 2013. They are just plain socks but I switched up the decreases.  A gal at the knit shop was showing me some socks she was making and she said the pattern called for doing the decreases opposite from what one would ordinarily do and it had a really nice look.

 
If you are familiar with top down sock knitting, after knitting the heel flap and turning the heel, you pick up and knit stitches on both sides of the heel flap. Then you complete the decrease rounds for the gusset.  For my socks, I was following instructions HERE for Susan B. Anderson's instructions called "How I Make My Socks".  

The portion of the instructions read like this:

Decrease rounds for the gusset:
Rnd 1:
knit all stitches
Rnd 2:
Needle 1: knit to the last 3 stitches, k2tog, knit 1 stitch
Needle 2 (instep): knit
Needle 3: knit 1 stitch, ssk, knit to the end of the needle
abbreviation:
ssk – slip 2 stitches separately as if to knit, knit the slipped stitches together through the back loops

Repeat rounds 1 and 2 until there are 16 stitches on each of Needles 1 and 3, and 32 stitches still remain on Needle 2.
 
 
But on my socks, I did the OPPOSITE for the decreases. Where it says "k2tog", I completed an "ssk"; where it says "ssk", I completed a "k2tog".  For the toe decreases, I also did OPPOSITE decreases.
 
I like how these socks turned out with the OPPOSITE decreases.  I have to say though... the first sock I knit on the Moab trip was knit rather loosely and the second sock I knit on the cruise ship trip was much more tightly knit.  I was more stressed out about the cruise ship trip since that kind of travel was all new to me.  Hmmm?  Maybe that has something to do with it. 

The yarn used in these socks is called Zitron Trekking (XXL).