Monday, December 2, 2019

Oh My Stars Quilt #2


Oh My Stars!


I realized recently that I was way behind in sharing photos of my recently completed knitting projects.  It also occurred to me that I have finished two quilts and also have not shared photos here on my blog.  This is a quilt I made for my friend Kerri. We've been friends since 4th grade. She and I attended a knitting retreat in October and I was able to bring the quilt to here then.  I really like how this quilt turned out. I had to go out and purchase batting for the quilt but, aside from that, I made the quilt from fabric in my stash.  Cool, huh?

The "Oh My Stars" quilt pattern is by Pat Sloan. The small version of the pattern is available for FREE and you can find the pattern here (LINK).  I have made this pattern twice already and I am sure I'll make more in the future.


Sunday, December 1, 2019

A Bunch of Cowls and a Scarf

A Bunch of Random Cowls and a Scarf...

When I was talking to my Mom and Dad on Thanksgiving, it occurred to me that I had completed a lot of projects recently but had not shared them here. Instead of one post for each project, I am throwing a bunch of projects into one big post.  These are all things to wear about your neck so I guess all of these projects have that in common. 

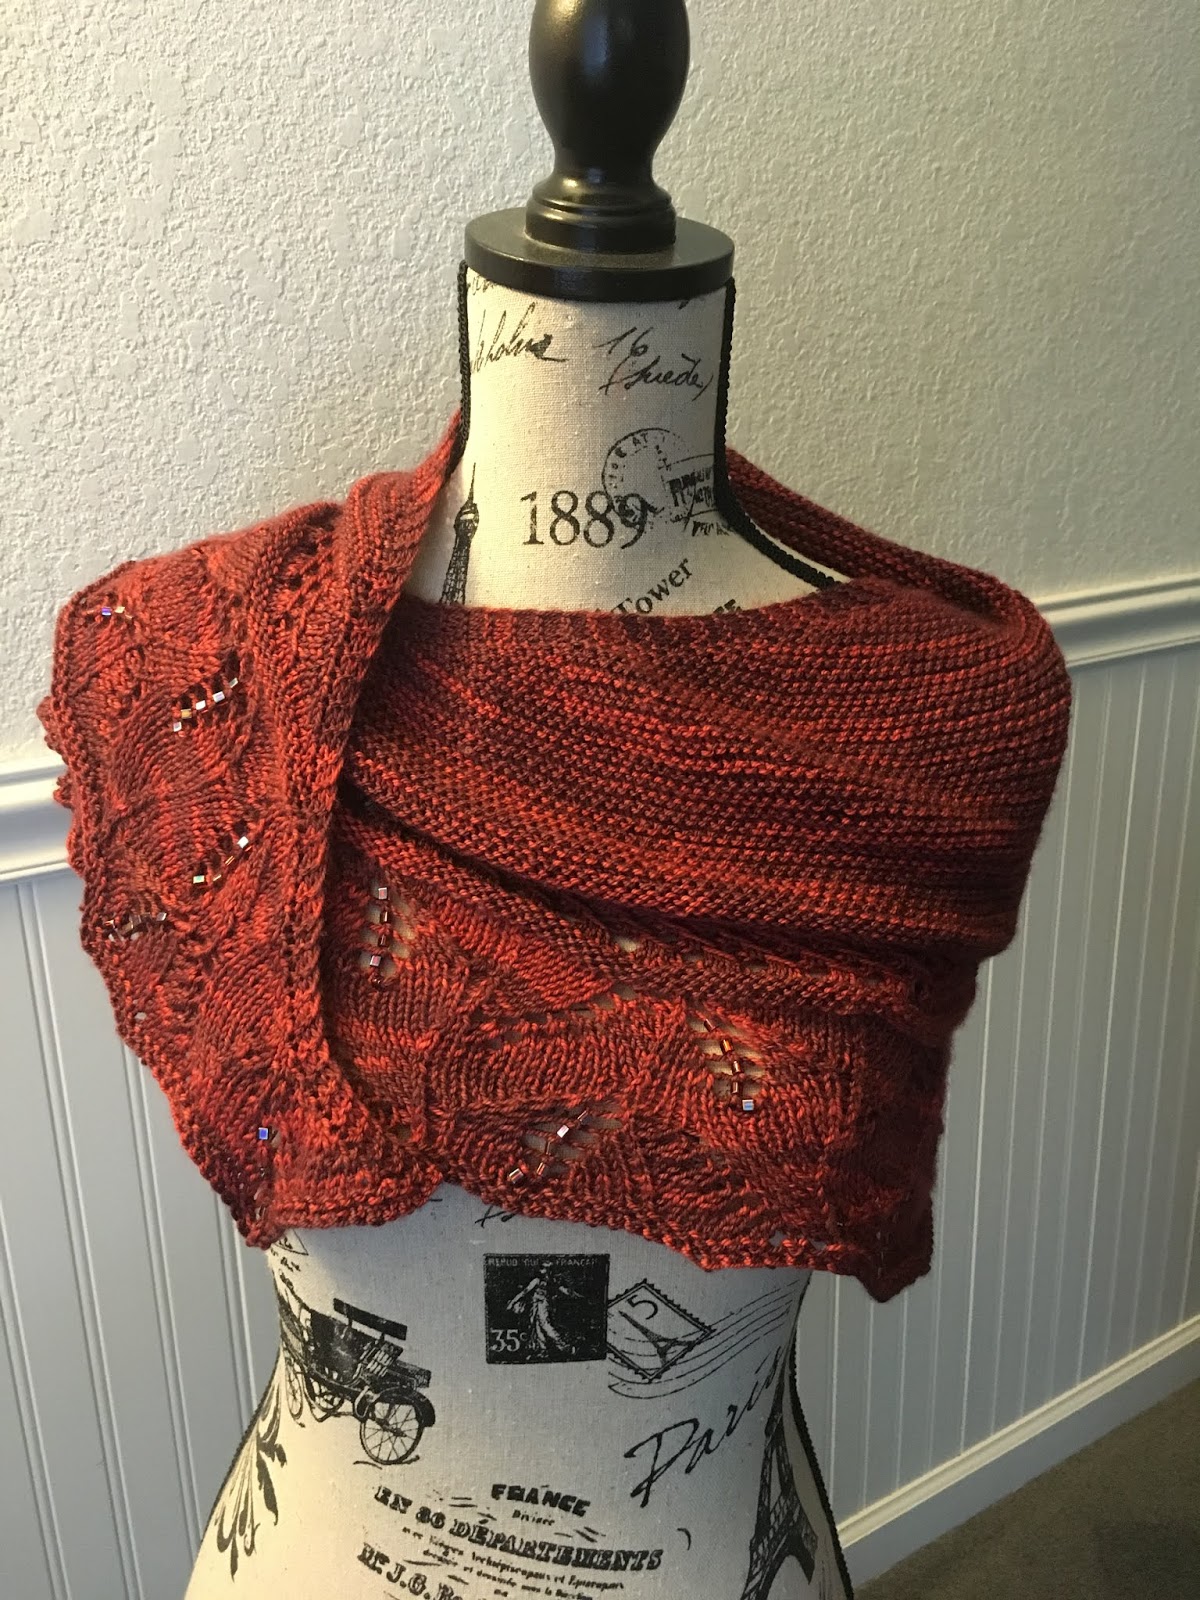
Above, the pink item is a pattern from Sivia Harding called "What Goes Around".  Sivia gave us this pattern at a knitting retreat I attended in October.  This pattern is not currently on Ravelry.  The yarn I used is called "Silkiull" from Navia.  The yarn is a fingering weight wool/silk blend. I got the yarn and beads from a kit I had purchased from Laura Nelkin. I was not enjoying knitting the pattern that  came with the kit so I made the little pink beaded cowl above.  This cowl is a moebius design.  I love how it turned out.


Above and below you can see a fun crochet scarf I made. The pattern is called "Windowpane Scarf" and, for this project, I used a ball of Knit Picks "Chroma" yarn which had been in my yarn stash FOREVER. This is a fun pattern and it's perfect for yarn that changes colors very slowly (if that makes sense). I love to wear this scarf. I stopped crocheting when I was just about out of yarn and I think my scarf is nearly 8 feet long.


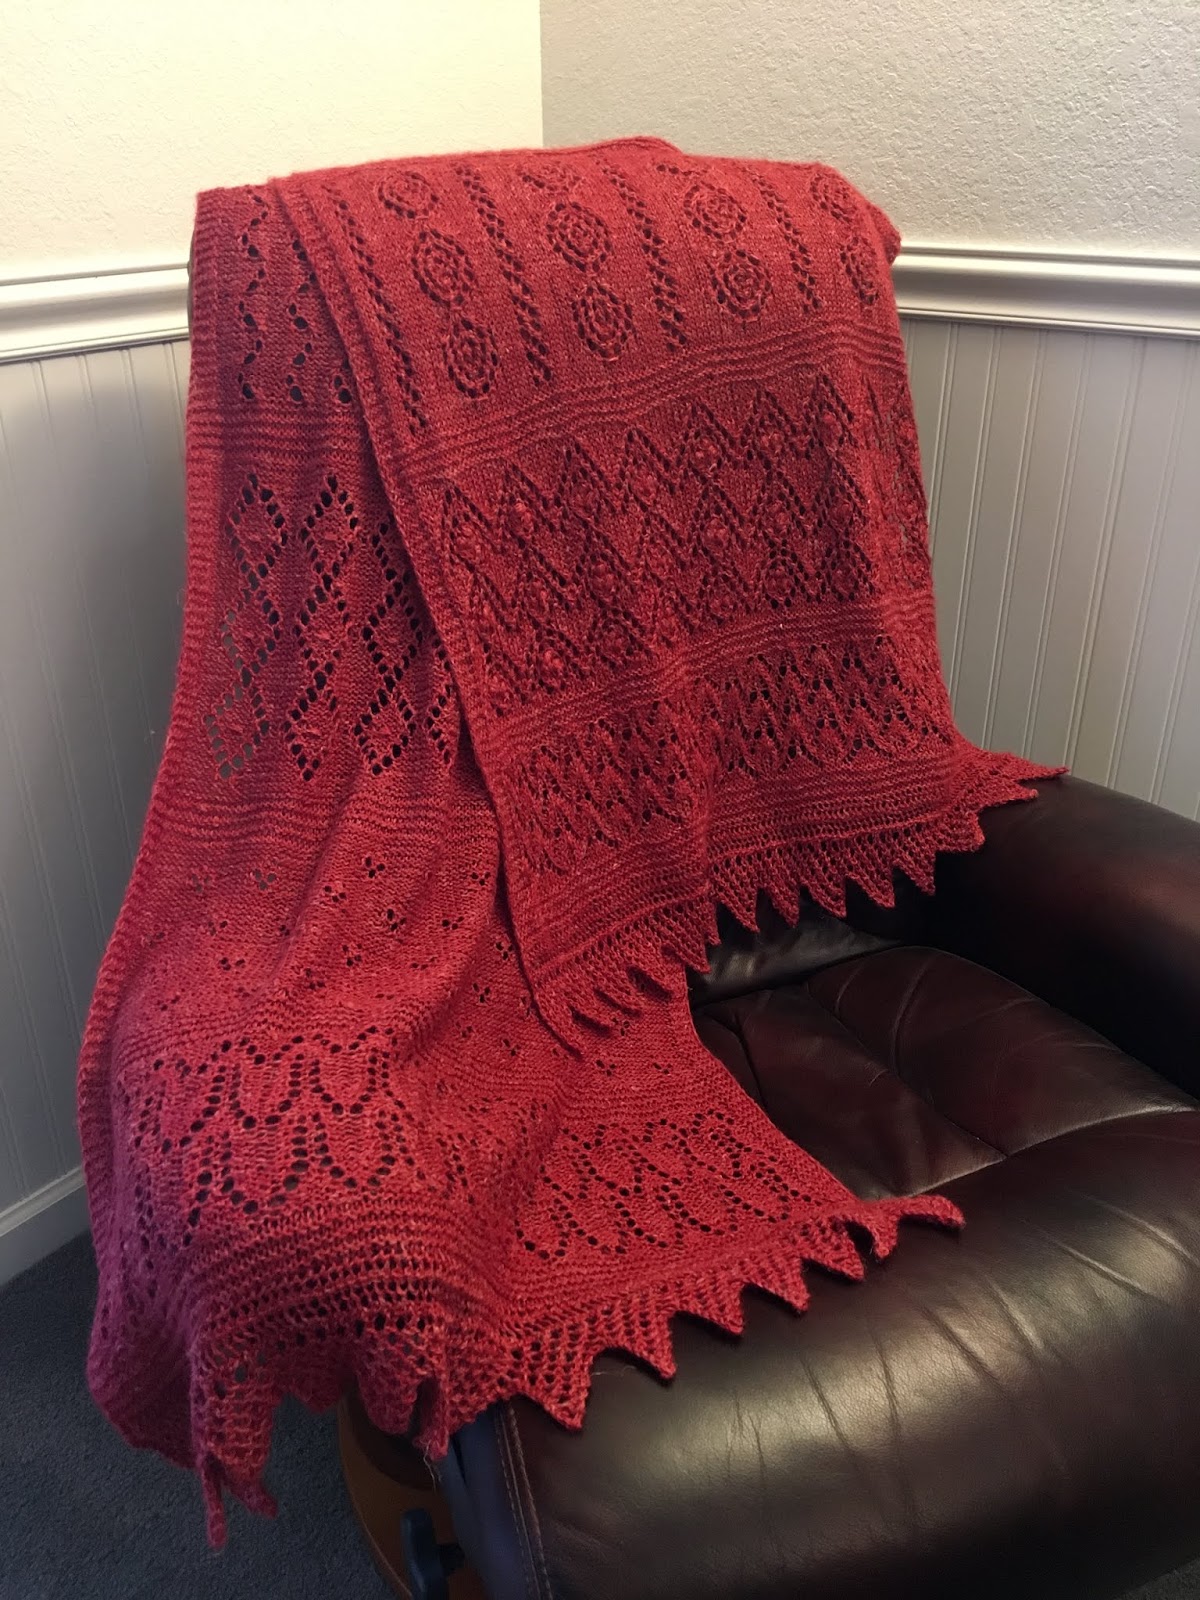
Above and below you can see another moebius scarf. This is a pattern by Cat Bordhi called "Moebius Cowl".  I modified this pattern quite a lot. I used fingering weight "Silkiull" yarn, which I mentioned above, but the pattern I used called for heavier weight yarn.  I added extra stitches at the cast on.  The pattern calls for a lace section at the end but I just finished my cowl with a garter stitch border instead.  This cowl wanted to roll a lot when I completed the bind off, but I think it's looking better after blocking.


Below is a chunky drop stitch cowl I whipped up.  I got this super pretty yellow-green yarn at the Salida Fiber Festival (Colorado) in September.  The yarn seller is called "Retold Yarns" and I love to buy yarn from this vendor.  Her colorway names are always lines from movies. This yarn colorway is called "One Mee-llion Dollars" which is from the Austin Powers movies. I've never seen those movies, but I like the yarn.  The pattern I used is called "Drop Stitch Cowl" and it's a great pattern for bulky yarn like this.


Below... just one more cowl.  This is a pattern call "Namu Cowl".  I am not sure what to make of this cowl. I just really need to wear it next time I go skiing or for an early morning hike on a cold day. This cowl seems rather narrow but it may just do the trick on a windy day when I don't want any cold air hitting my neck and blowing into my jacket.  The yarn I used for this is Cascade "Pacific".  I use this yarn a lot. It's very soft, reasonably priced, and has a nice sheen to it.


So there you have... a bunch of cowls and a scarf.  I did not add pattern links in this post since there are so many different patterns mentioned.  If you want more details about my projects or you want the pattern links, feel free to check out my project pages on Raverly where my 
User Name is "kimfluck".

Saturday, November 30, 2019

Harmonia's Rings Cowl


Harmonia's Rings Cowl


In a prior post, I mentioned I attended a knitting retreat in October.  The hostess was Sivia Harding. The focus of the retreat was moebius knitting.  I had watched some moebius knitting videos in the past but had never tried any moebius projects.  The cast on and the moebius knitting process are  fascinating.  If you've never tried it, I encourage you to add a moebius knitting project to your knitting bucket list.

Just to give you an idea how unique moebius knitting is, I encourage you to check out this video from Cat Bordhi.  She is the clever woman who figured out this cast on.  The video can be found HERE.
Also, if you happen to subscribe to "Bluprint" (formerly called "Craftsy"), Cat Bordhi has some great videos and moebius knitting projects on that site.


This cowl starts out as a moebius. Perhaps you can see the unique shaping in the collar portion?  The collar portion also features a picot bind off which I don't think you can see in the photos.  I apologize the photos are not the greatest.

The yarn I used in this project is yarn I purchased at the retreat.  Folks representing Abundant Earth Fiber came to the retreat with yarn and yarn dyeing equipment.  The yarn I used is called "Aviary"; it's a worsted weight yarn made from Merino wool and alpaca.  I made my cowl much longer than the pattern called for so I could use as much of the yarn as possible.  I kind of think of this item as a short cape.  It's easy to wear and it's warm and cozy.  The Harmonia's Rings Cowl is available for purchase on Ravelry.

Friday, November 29, 2019

Sky Above, Earth Below


Sky Above, Earth Below


In October, I went to a knitting retreat in the San Juan Islands (Washington State).  The hostess of the retreat was Sivia Harding, who is a knitwear designer.  Prior to the retreat, she sent all the retreat participants a number of her patterns.  That way, we could pack accordingly... what yarn to buy, what needles to bring, and so on.


"Sky Above, Earth Below" is one of her patterns.  You can make a multi-colored larger version of the shawl or you can make a small version using just one skein of fingering weight yarn.  You can also opt to add beads or not.


Here is my one-skein version of Sky Above, Earth Below.  The yarn is from Sun Valley Fibers (Merino Wool, Cashmere Goat, and Nylon) and the colorway is called "Crimson Leaves".  I did not do a gauge swatch before starting this project and I noticed I was running out of yarn as I was nearing the end. I had to skip a number of rows at the end. Perhaps I was knitting too loosely and used up the yarn too fast.  Oh well!


I have completed a bunch of other projects in the past several weeks.  I'll take a little time to show you over the next few days.


Tuesday, September 17, 2019

Building With Lace


Building With Lace


A quick post to show you a project that was NOT a quick knit. I've been working on this lace project called "Building With Lace" on and off since January.  This is a pattern by Michelle Hunter (AKA: KnitPurlHunter).  The yarn is called "Rylie" by HiKoo and the fiber content is baby alpaca, mulberry silk, and linen.  The color way is called "Sailor's Delight".  All of the Rylie yarn has "beachy" names such as sand, seagrass, abalone, etc.  

The project starts with a provisional cast on and then you progress from one lace section to another. There is a band of eight rows of garter stitch between each different lace pattern.  At the end, you finish with a sawtooth border and then you go back to the provisional cast on, pick up the live stitches, and do the sawtooth border on the opposite end. I timed myself to see how long it took me to work one sawtooth on the border and it took me about 15 minutes to complete one sawtooth... and there are 30 sawteeth (sawtooths?)… but whose counting, right?  By the time I got to the borders, I was really ready to be done with this project!

 It was challenging to block something so large.  I soaked the entire piece in water and then pressed out much of the water. I spread it all out over a large blanket on the floor to shape it into a rectangle as best as I could.  After it dried, I re-blocked the points of the borders on my blocking mats using blocking pins and my spray bottle of water to help them hold their sawtooth shape.  

I am really happy with this project.  I've purchased more of this yarn to make this again; I think the yarn I selected is called "Sand".  The pattern calls for beads which are primarily added to the borders... over 600 beads.  When I make this again, I may add beads. I am mulling that over right now.  I opted to not add the beads to my red version.  Another random note about this project is that I had to use needles much smaller than recommended in the pattern. The pattern calls for US Size 6 needles to get gauge and I had to use size US Size 4 needles to get gauge.  I was concerned about running out of yarn so I did fewer pattern repeats in a two sections to ensure I was not playing "yarn chicken" during the borders.  In the pattern, Michelle Hunter specifies that each border takes about 20 grams of yarn which is extremely helpful if you are concerned about running out of yarn. I weighed my yarn before and after I knit my second border and border #2 did take 21 grams of yarn.

As always, Michelle Hunter's pattern was an absolute joy to follow. I've learned so much from making her projects including "Building Blocks", "Building in Color" and now "Building with Lace".  What is amazing about these patterns is the video support you can find on Michelle Hunter's website which can be found HERE.  In the written pattern instructions for each section of the project, you are directed to her website where you can watch instructional videos for each skill in that section of the project (ie. provisional cast on, nupps, smocking stitch, sk2p decreases, and so on).

It was challenging to photograph this project to show you how lovely all the designs are. Here are all my photos... some photos are better than others but I am just uploading them all.  Forgive the random dog or electrical outlet in the photo background. 


Wednesday, September 4, 2019

Arctic Quilt


Arctic Quilt


Quilting is still new to me. I was quick to discover that managing a big quilt in a sewing machine is difficult and cumbersome.  I won't give up on this skill but, in the mean time, I am really enjoying exploring some Quilt as You Go (QAYG) techniques.  I've learned that QAYG can mean a lot of different things, but I am focusing on techniques which allow me to heavily quilt smaller pieces (ie. 12 inch square blocks) and then sew the blocks together.

I saw Jera Brandvig on a YouTube video and she was talking about her books called "Quilt as You Go Made Modern" and "Quilt as You Go Made Vintage".  I loved the techniques she was using in the video so I bought the modern version of her books.  Here is her quilt pattern called "Rainy Days".  I made it using a "fat eighth" bundle and some white fabric with white polka dots.  Jera's technique for this quilt is to quilt a 7 1/2 x 10 inch rectangle on a piece of batting which is about 10 1/2 inches square. After you quilt the initial rectangle onto the batting, you then sew on border strips above and below the initial rectangle.  After pressing, you do additional quilting on the border strips.  Then you trim the blocks to 9 1/2 inches square.  When all blocks are done, you sew the blocks into rows and then you sew all the rows together.  Next you add the backing to the quilt top. To me this proved to be just a difficult as quilting a larger quilt top in my sewing machine.  The backside of the quilt is a little floppy and not heavily quilted like the front of the quilt is.  After the backing was secured by stitching in the ditch between the various blocks, I applied a nice neutral gray binding.  I've included some close up photos of some various blocks so you can see how fun and creative the quilting part was for me. I even used a bunch of my decorative stitches for variety.  

I am really loving the QAYG techniques.  My next project is my Quilt Sampler project. I've shown it in a few posts already.  I think I have 20 blocks. I am going to quilt each block separately with top, batting, and backing, and then assemble the blocks with sashing strips.  Yesterday I did some practice "Free Motion Quilting" on an extra quilt block and I am loving the Free Motion Quilting.  I've decided that will be my technique for the Quilt Sampler project.  I need to buy fabric for the batting.  In fact, I am typing this post right now, killing time until my local quilt shop opens in 6 minutes.  Off to buy some fabric!


Tuesday, September 3, 2019

Yoga Mat Bag


Yoga Mat Bag


I am pretty happy with how my yoga mat bag turned out. I added a clasp to the side to hold my car keys.  I added a zipper pouch to the outside to hold my wallet or any other small items I might need to keep secure.  The outside of the bag and the bag's straps were made from 4 fat quarters. The lining is from fabric I've had in my stash for a number of years.

 The bag's construction was inspired from a pattern from www.whitneysews.com.  The pattern is called "Drawstring Bag with Circular Bottom".  I started out with a large piece of fusible fleece (about 23 inches by 28 inches). I cut my fat quarters into a bunch of 3 inch x 22 inch strips.  I placed one strip of fabric right side up along the short end of the rectangle and then placed another strip right side down on top of the first rectangle.  I stitched along the long end of the rectangle with a 1/4 inch seam and then pressed the two strips open, being careful not to touch the iron to the adhesive on the fusible fleece.  I continued in this manner until I had a striped quilted piece down the length of the fusible fleece.  I trimmed the fleece to about 21 inches x 27 inches (my yoga mat is 24 inches wide). I neglected to take more photos along the way. Sorry.  

I just finished up a really cool Quilt as You Go (QAYG) quilt and am really happy with how that turned out. I'll be sure to show you that next.  Happy Sewing, Knitting, Crocheting.... whatever makes you happy!

Thursday, August 29, 2019

Happy Scrappy Quilt


Happy Scrappy Quilt


I made this quilt using materials I had on hand.  The quilt is assembled from gobs of 4 inch squares as you can see. The quilt is backed with yellow fabric which is decorated with Snoopy and polka dots.  I hand tied the quilt with lavender colored DMC Perle cotton.  I love how cheerful and bright this quilt turned out.  Sandy approves as well.  


Tuesday, August 13, 2019

Oh My Stars


Oh My Stars


"Oh My Stars" is a free quilt pattern by Pat Sloan. You can get the pattern HERE.  The quilt is basically 5 x 5 inch squares.  You can purchase pre-cut 5 x 5 inch squares in Charm Packs. I found my Charm Packs at a store called "Tuesday Morning".  The black fabric I used for the stars and binding and the gray fabric I used for the border and backing are fabrics I got at my local quilt shop.

I intended to do the quilting on this project on my Babylock Jazz II machine but I am finding it difficult to maneuver something so big on my machine.  I tried a little hand quilting and decided that wasn't for me. I decided to "hand tie" my quilt. I did not like the look of the knots on the front of the quilt so I place the knots on the back.  For the hand tying, I used perle cotton that I found at my local yarn shop.

I love how the points of the stars cleverly extend into to quilt's border.

If you enjoying quilting, I encourage you to check out Pat Sloan's blog which you can find HERE.  Pat offers may free quilt along patterns.  She also has a great Facebook group.  It's fun to see what others are making.