Friday, December 28, 2018

Christmas Gifts... Sewing


Christmas Gifts

I started this post a year ago and never finished it.  This Christmas and last Christmas I made up some Christmas gifts.  I just thought I'd put them in one post... my mom likes to see what I sew.

At the very top, a fleece blanket I made up for Sylvia (my son's girlfriend).  I just trimmed the edges of the fleece with a rotary cutter and then perforated little holes around the perimeter of the blanket with a skip stitch blade in my rotary cutter. Then I just crocheted a simple border around the blanket. She loves this blanket. She brings it with her every time she comes to visit.


I also made up some pot holders.  A lot of these cute fabrics are from my Mom's fabric stash. Thanks, Mom!


This year and last year I also made up a number of soup bowl cozies.  These are not microwave safe but it's nice to put a hot bowl of soup or oatmeal in a bow cozy to keep your hands from burning.  I like using two contrasting fabrics in the bowl cozies. The cozies are reversible so you can use what ever side you like.  I made the bowl cozie in blue for Zach.


The bowl cozy in tan and burgundy features a Harry Potter themed fabric; it's a fabric that resembles the Marauders Map.  Sylvia loves the Harry Potter books so this bowl cozy was made for her.


This bowl cozy with flames on it was my practice bowl cozy.  I gave this one to Zach, too!


I am suddenly having a difficult time adding photos to my blog posts and it's messing with the formatting. So I apologize if this post comes through a little weird looking.  Frustrating!


Sunday, December 16, 2018

Mitts for the Shop


Some Fingerless Mitts for the Shop

My local yarn shop is Yarned & Dangerous in Canon City, Colorado. The yarn shop owner, Ann, often receives samples of yarn and needles from vendors.  Recently I was able to bring home some of these goodies and knit up some items for the shop.  I ended up making two pairs of fingerless mitts.

Up first:  Yarn from Sirdar brand. The yarn line is called "Sublime" which I gather is Sirdar's Luxury Line of yarn (that's what the label says).  The yarn is named "'Elodie" and the color way is "Rosalyn".  Right away, the yarn reminded me of a Claude Monet Impressionist painting.  This is a pattern I improvised as I went along. I've made mitts before using just 50 grams of DK weight yarn. Thankfully I kept some good notes  from the prior mitts so I whipped these up in no time and did NOT run out of yarn.  Yay!


What do you think? I think the colors are so similar to the Monet Haystack painting.


Up next: Yarn from Louet brand. This yarn is called "Gems" (it's a 
Sport Weight yarn) and the color is a lovely shade of lavender.  The pattern is FREE on Ravelry and is called "Emilee Dee Mitts".  It's a favorite pattern of mine.  It's a great pattern for DK and Sport Weight yarn. I made these mitts a little longer than the pattern calls for and I also added a few rows to the thumb.  


My girl dog Sandy is my little shadow. I sort of kneeled down on the carpet to snap some photos of the mitts and Sandy decided she needed to be in the shot as well. She even got the concept:

 "We are taking photos of our FRONT PAWS!"


Adorable dog!  

For both pairs of mitts, I used some amazing knitting needles.  They are pictured above at the very top. The needles have the "Louet" brand name on them but they are made by Kollage.  These are square (not round) double pointed needles, US Size 4, and they are made of brushed metal. The points are nice and sharp.  I loved knitting with them and highly recommend them.


Thursday, December 13, 2018

Little Christmas Stockings


Little Christmas Stockings


I made up this Little Christmas Stocking pattern a few years ago; the pattern calls for worsted weight yarn.  I have been wanting to make some of these stockings, but just did not have the right colors for Christmas stockings in my yarn stash in worsted weight.

I decided to try out the pattern in some yarns I had on hand but the yarns were heavy fingering weight and DK weight.  In the stocking above (in two shades of gray), the cuff is a darker faux mohair yarn and the rest of the stocking is a lighter gray DK baby yarn. Both yarns are from King Cole brand yarns.

In the stocking with white cuff and the green stocking, I used a white DK baby yarn and Patons Kroy Sock yarn.  These are fun and quick. The smaller stockings look nice hanging on a Christmas tree.

For both of these stockings, I used US Size 4 double pointed needles.


Tuesday, December 4, 2018

Weaving


Weaving


My local yarn shop, Yarned & Dangerous in Canon City, Colorado, has many folks enthused about a new hobby... weaving.  This is thanks to Diane and Ann (the shop owner).  Diane has been teaching a variety of weaving classes at the shop this past year and I just had to give it a try to understand a little bit more what everyone was talking about. Warp! Weft! Heddle! What?!?

At Yarned & Dangerous, there is a corner of the shop dedicated to weaving supplies and now customers can purchase Ashford brand weaving looms through the shop.  It's so fun to see what folks are making on their looms.  You can follow the "Yarned & Dangerous" Facebook page at this following LINK.


In my weaving class (back in October I think) I used a small table top loom.  Diane already had the warp on the loom for all of the students.  The warp are the threads of yarn on the loom that are "vertical".  When you weave through the warp in a horizontal manner (back and forth), that's the weft.  We got to try out a variety of stitches as you can see in my weaving above.  When I was done with my weaving, I turned the warp into fringe at the bottom of the weaving.  At the top, I used some macramé stitches and attached the weaving to a twig from a cottonwood tree.

I don't plan to invest in a loom any time soon, but I do love the look of the woven items folks at the shop are making.


Wednesday, November 28, 2018

Girasole in Gray


Girasole


I've been knitting for ten years.
I think this might be my most very favorite completed project... EVER.


Believe it or not...
I started this in February 2016 and I adored working on this project for one weekend.
And then for some reason I stopped.
And it sat.


A few weeks back I finished up my Building in Color Afghan which had also lingered for quite awhile but NOT as long as this project.  It sure felt great to finish up such a big project when I finished Building in Color so I decided to tackle this next.


And it is done and I am so happy.

I really should have taken photos BEFORE and AFTER blocking. This project changed dramatically when it was blocked.  I soaked the afghan in water and then spread it out on a full size bed mattress that was covered in many layers of sheets and blankets (so as not to damage the mattress).  I turned on the ceiling fan above the mattress to aid in drying and it dried overnight. To give you an idea of how large this afghan is, it completely covered the full size bed mattress and also hung over the sides a few inches.  Big!


Pattern: Available on Ravelry "Girasole" by Jared Flood
Yarn: Cascade 220 Superwash
Needle:  US Size 9


Tuesday, November 13, 2018

Holiday Ornaments


Holiday Ornaments

I took a little time over the past few days to make up some holiday ornaments. These are so much fun.  For these ornaments you need some fabric (jelly roll strips, left over scraps, or fat quarters),
2 1/2 inch Styrofoam balls, and a million little straight pens.

You know what they say about potato chips... you can't eat just one...

Well, these ornaments are JUST like that.  They are so fun to make and so great looking that once you start, you can't make JUST one.  So.... you have been WARNED in advance.

I might keep one of these to go with the ornaments I made last year.
I might give one of these away as a gift.
Most of these will be hung on the Christmas tree at my local yarn shop (Yarned & Dangerous in Canon City, Colorado).  All the ornaments given to the shop are put on a tree and shoppers can donate a minimum of $10.00 for an ornaments; the proceeds go to the local Humane Society.

Here are the ornaments I made up this week.  You can click on each photo to see the detail a bit better.


Here is a link to a YouTube video you can watch if you'd like; the video will show you everything you need to know to make these ornaments:  https://youtu.be/fV_XtQ_tJ_A


Sunday, November 11, 2018

Nelkin Designs "Lolatude" Kit #2... one more pot holder


The other day I posted a photo of a wool pot holder I had finished.  It was what I made from a kit I received in the mail from "Nelkin Designs".  I was able to make one more pot holder with the yarn I received.  When I downloaded the pot holder pattern, I also received access to more octagon designs so I tried out the design you see above which is called "Honeycomb". The yarn colorway is called "Honey" so I just had to make the Honeycomb design, right?

Below you can see both pot holders together. They have great texture/design. They are supposed to be felted and I just haven't gotten around to that yet. I am really curious to see how the texture/design changes when they are felted.


The new skill I learned in this octagon is "purl center double decrease" (PCDD). It's the opposite of a "center double decrease" (CDD).  These decreases are excellent since they do not lean left or right and are both good techniques to have in your knitting bag of tricks.


Above are photos of the pot holder after blocking.
Below is a photo of the pot holder before blocking.


These octagon designs are part of an afghan pattern by Laura Nelkin called "Contexta". After having so much fun with the pot holders, I've designed I must make the Contexta afghan.  The octagons are stitched together with mitered squares.  It will be a super fun project I think!

If you'd like to see the Contexta afghan on Ravelry, click HERE.

Friday, November 9, 2018

Nelkin Designs "Lolatude" Kit #2


Nelkin Designs "Lolatude" Kit #2


Woo Hoo!  My second "Lolatude" kit arrived this week. I signed up to receive a kit every other month for 12 months. This is kit #2.  This kit included some tea, a stitch marker, a skein of 100 percent wool yarn, and a pattern for an octagon-shaped pot holder.  I have not yet felted my pot holder.  I have enough yarn to make a second pot holder so I will hold off on felting until pot holder #2 is done.

The pattern design is by Laura Nelkin and the pattern is called "Another Context(A)".  When I downloaded the pattern, I also received a copy of Laura Nelkin's pattern called "Contexta".  Contexta is an afghan or shawl pattern and the projects are made by connecting knit octagons and mitered squares.  The Contexta pattern contains instructions for how to make the octagon centers differently (six different designs).  My octagon is called "Luminary Octagon".  Since I have enough yarn to make a second pot holder, I plan to try out a different design from the "Contexta" pattern.

It sure is fun to receive a mystery kit every other month.  I also love that I always learn a few new techniques from each pattern.


Here are some pattern links if you'd like to see these patterns on Ravelry.

Another Context(a) pot holder pattern: Click HERE.

Contexta afghan or shawl pattern:  Click HERE.

Thursday, November 8, 2018

Building in Color Afghan: Complete


Building in Color Afghan: Finally DONE!


This project has been in the works for a very long time. I selected the yarn for this project nearly two years ago.  I was scheduled to teach this pattern as a year-long class during 2017.  I had four students in my class and we met one time each month for a year.  No one in the class finished their afghans as far as I know it. We were all just kind of burned out.  These same students had all taken my year-long Building Blocks Afghan class during 2016 and I think we were all just sort of tired of afghan knitting.

During all of 2018, I have been teaching this pattern again as a year-long class with four new students.  These gals are on top of things and keeping me on my toes.  All year long, I've been telling these gals that I needed to get my panels sewn together.  This past Saturday we worked on the final panel in class (Panel #10) so I had to get my afghan done!  I in December, I show the students how to sew the panel together and in January 2019, we will learn how to knit the borders.

If you would like to see all of my prior posts about this Building in Color Afghan project, you can see those posts HERE.

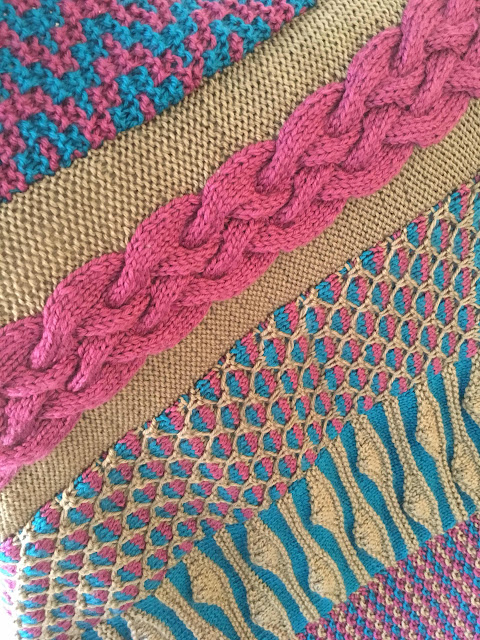
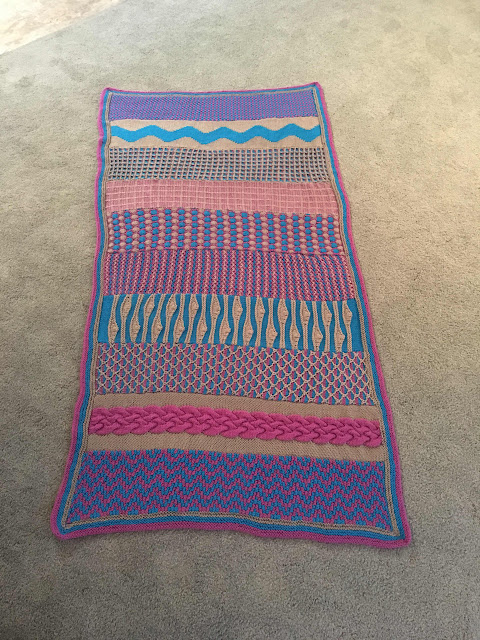
As you can see, this project is comprised of 10 different long rectangular panels.  Some panels are made with two colors and other panels are made with three colors.  The panels were all stitched together with the mattress stitch and then borders with mitered corners were added at the end.  Sewing all of these panels together was very challenging, but it can be done. I ended up having to take apart the bind off edge of one panel to make it shorter.  The interesting thing about this project (aside from learning color work skills) is that you learn that each type of stitch pattern creates a very different fabric. Some panels wanted to stretch length-wise and others wanted to stretch width-wise. Some panels were super stretchy and others did not have much elasticity and were rather dense.

I've tried to take some photos so you can see the project well.  It's hard to get it all in!  I should point out four things I changed to the pattern.

(1) The bind off around the entire afghan was supposed to be a Picot Bind Off.  I did not like the look of it so I just did a regular bind off.
(2) One panel is sewn in upside down because I liked the looks of the wrong side better than the right side.
(3) One panel was supposed to have some embroidery stitch embellishments (the tan colored panel with the squiggly blue zig zag should have pink polka dots on it).  I did not like the idea of having just one panel with polka dots so I left them out.  In some of the photos below, you can see one lonely pink polka dot on the panel I am referencing.  I removed it.
(4) The pattern calls for DK weight yarn but I used worsted weight yarn and larger needles than called for in the pattern.


Below: Very first panel sewn together!  Woo hoo!


I cannot tell you how many hours I sat at my dining table between Saturday and Wednesday this past week.  I was sending my mom updates here and there via email as I was working on this and, when it was all done, she said, "Wow! You got that done really quickly!"

No, it took FOREVER but I was just so determined to get it DONE!

The sewing together did get easier as I went along but the mattress stitch was so tough because you are just not knitting together two panels in stockinette stitch. You are dealing with all sorts of fabrics and techniques and it's hard to find what you should grab for a nice looking seam both on the right side and the wrong side.  Also, you are constantly having to adjust how you worked the mattress stitch because you are easing in the fullness due to differences in the panels.

The borders were not too tricky but I ended up having to redo the border on one of the short sides. I had picked up far too many stitches and, as a result, had a very ruffled border.  I am glad I took it out and did it over.  My one complaint about the border is that it created so many more loose ends to weave in and also I had a tough time stitching together the mitered corners.  If I were to do this again, I would use one very long cable and knit the border in the round (you can buy extenders to hook together multiple cables... I think it could be done!)


So there you have it!  Frankly I am just tired of this project and so happy to move onto something new.

Afghan burn out! It's a thing.

On a positive note, I am over the moon to have learned so many new skills from this project.  If you are up for a challenge and want to learn some new skills, this project is amazing.  While I've been excited to have the opportunity to teach this project in a class setting, you don't need to take a class.  The pattern designer, Michelle Hunter, has excellent videos for each skill on her blog.  Her videos are great; you can find them all here.

As a quick recap, here is a quick list of some of the many skills which were NEW to me in this project:
  • Intarsia
  • Double Ended Knitting
  • Short Rows
  • Knit Below
  • Make One Purl
  • Elongated Stitch
  • Mosaic
  • Butterfly Stitch
  • Intarsia with a Cable
  • Tuck Stitch
  • Mattress Stitch
Happy Knitting! Hopefully I'll have some more completed projects to show you sometime soon.  

Saturday, November 3, 2018

Clever Construction Cap


Clever Construction Cap


This is my second attempt at this hat. This is a hat pattern I made up on the fly last year.  For both hats, I used Cascade Pacific yarn (it's a worsted weight wool/acrylic blend). The first hat was knit in a great charcoal color and the latest hat, as you can see, is a great blue color.  I love way this hat fits me (even looks good when I wear my glasses which is sometimes a problem with stocking caps) but better yet... the hat looks great after several washings in the washing machine.

I am working on writing up this hat pattern.  As you can see, this design appears to be rather ordinary. The brim is a "knit 2, purl 2" ribbing.  After the ribbing, the hat appears to be alternating bands of knit areas and purl areas, but it's not. After the ribbing, the hat is entirely worked in KNIT stitches.  Pretty cool, huh?  Once I get the pattern worked up, I'll be sure to share about it here.