Tuesday, September 17, 2019

Building With Lace


Building With Lace


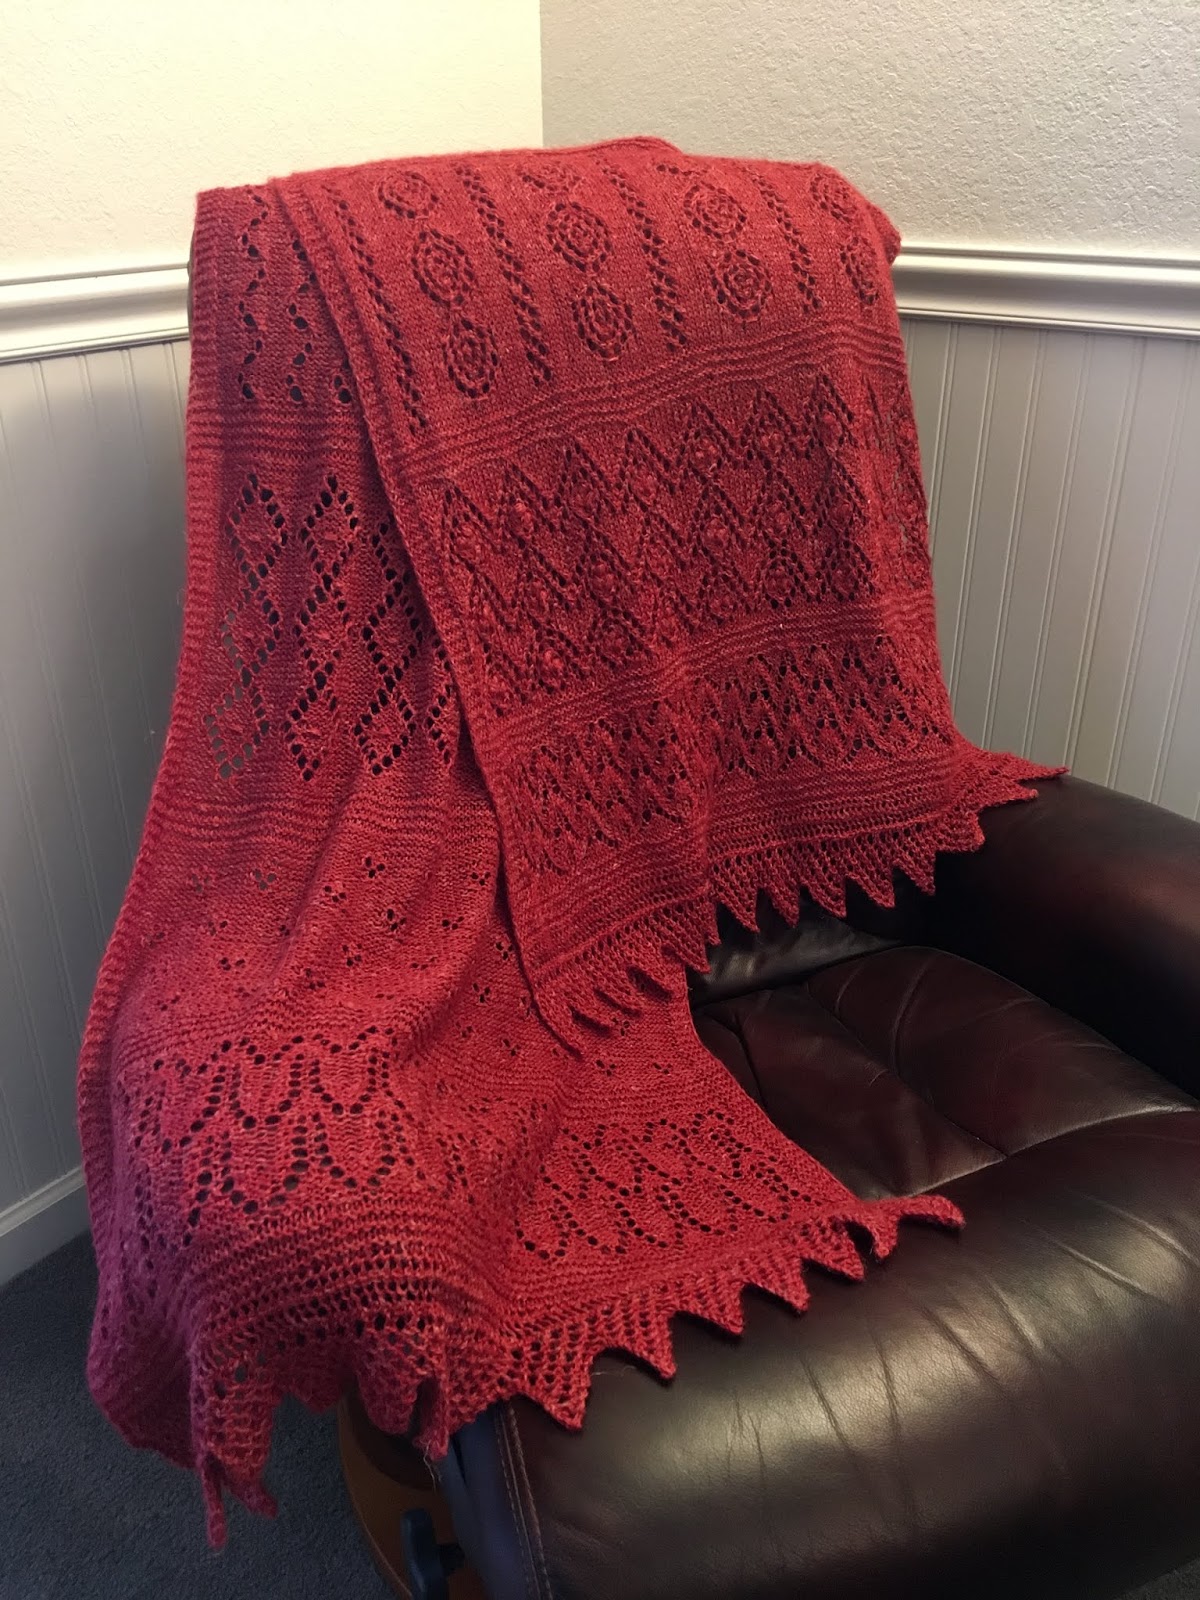
A quick post to show you a project that was NOT a quick knit. I've been working on this lace project called "Building With Lace" on and off since January.  This is a pattern by Michelle Hunter (AKA: KnitPurlHunter).  The yarn is called "Rylie" by HiKoo and the fiber content is baby alpaca, mulberry silk, and linen.  The color way is called "Sailor's Delight".  All of the Rylie yarn has "beachy" names such as sand, seagrass, abalone, etc.  

The project starts with a provisional cast on and then you progress from one lace section to another. There is a band of eight rows of garter stitch between each different lace pattern.  At the end, you finish with a sawtooth border and then you go back to the provisional cast on, pick up the live stitches, and do the sawtooth border on the opposite end. I timed myself to see how long it took me to work one sawtooth on the border and it took me about 15 minutes to complete one sawtooth... and there are 30 sawteeth (sawtooths?)… but whose counting, right?  By the time I got to the borders, I was really ready to be done with this project!

 It was challenging to block something so large.  I soaked the entire piece in water and then pressed out much of the water. I spread it all out over a large blanket on the floor to shape it into a rectangle as best as I could.  After it dried, I re-blocked the points of the borders on my blocking mats using blocking pins and my spray bottle of water to help them hold their sawtooth shape.  

I am really happy with this project.  I've purchased more of this yarn to make this again; I think the yarn I selected is called "Sand".  The pattern calls for beads which are primarily added to the borders... over 600 beads.  When I make this again, I may add beads. I am mulling that over right now.  I opted to not add the beads to my red version.  Another random note about this project is that I had to use needles much smaller than recommended in the pattern. The pattern calls for US Size 6 needles to get gauge and I had to use size US Size 4 needles to get gauge.  I was concerned about running out of yarn so I did fewer pattern repeats in a two sections to ensure I was not playing "yarn chicken" during the borders.  In the pattern, Michelle Hunter specifies that each border takes about 20 grams of yarn which is extremely helpful if you are concerned about running out of yarn. I weighed my yarn before and after I knit my second border and border #2 did take 21 grams of yarn.

As always, Michelle Hunter's pattern was an absolute joy to follow. I've learned so much from making her projects including "Building Blocks", "Building in Color" and now "Building with Lace".  What is amazing about these patterns is the video support you can find on Michelle Hunter's website which can be found HERE.  In the written pattern instructions for each section of the project, you are directed to her website where you can watch instructional videos for each skill in that section of the project (ie. provisional cast on, nupps, smocking stitch, sk2p decreases, and so on).

It was challenging to photograph this project to show you how lovely all the designs are. Here are all my photos... some photos are better than others but I am just uploading them all.  Forgive the random dog or electrical outlet in the photo background. 


Wednesday, September 4, 2019

Arctic Quilt


Arctic Quilt


Quilting is still new to me. I was quick to discover that managing a big quilt in a sewing machine is difficult and cumbersome.  I won't give up on this skill but, in the mean time, I am really enjoying exploring some Quilt as You Go (QAYG) techniques.  I've learned that QAYG can mean a lot of different things, but I am focusing on techniques which allow me to heavily quilt smaller pieces (ie. 12 inch square blocks) and then sew the blocks together.

I saw Jera Brandvig on a YouTube video and she was talking about her books called "Quilt as You Go Made Modern" and "Quilt as You Go Made Vintage".  I loved the techniques she was using in the video so I bought the modern version of her books.  Here is her quilt pattern called "Rainy Days".  I made it using a "fat eighth" bundle and some white fabric with white polka dots.  Jera's technique for this quilt is to quilt a 7 1/2 x 10 inch rectangle on a piece of batting which is about 10 1/2 inches square. After you quilt the initial rectangle onto the batting, you then sew on border strips above and below the initial rectangle.  After pressing, you do additional quilting on the border strips.  Then you trim the blocks to 9 1/2 inches square.  When all blocks are done, you sew the blocks into rows and then you sew all the rows together.  Next you add the backing to the quilt top. To me this proved to be just a difficult as quilting a larger quilt top in my sewing machine.  The backside of the quilt is a little floppy and not heavily quilted like the front of the quilt is.  After the backing was secured by stitching in the ditch between the various blocks, I applied a nice neutral gray binding.  I've included some close up photos of some various blocks so you can see how fun and creative the quilting part was for me. I even used a bunch of my decorative stitches for variety.  

I am really loving the QAYG techniques.  My next project is my Quilt Sampler project. I've shown it in a few posts already.  I think I have 20 blocks. I am going to quilt each block separately with top, batting, and backing, and then assemble the blocks with sashing strips.  Yesterday I did some practice "Free Motion Quilting" on an extra quilt block and I am loving the Free Motion Quilting.  I've decided that will be my technique for the Quilt Sampler project.  I need to buy fabric for the batting.  In fact, I am typing this post right now, killing time until my local quilt shop opens in 6 minutes.  Off to buy some fabric!


Tuesday, September 3, 2019

Yoga Mat Bag


Yoga Mat Bag


I am pretty happy with how my yoga mat bag turned out. I added a clasp to the side to hold my car keys.  I added a zipper pouch to the outside to hold my wallet or any other small items I might need to keep secure.  The outside of the bag and the bag's straps were made from 4 fat quarters. The lining is from fabric I've had in my stash for a number of years.

 The bag's construction was inspired from a pattern from www.whitneysews.com.  The pattern is called "Drawstring Bag with Circular Bottom".  I started out with a large piece of fusible fleece (about 23 inches by 28 inches). I cut my fat quarters into a bunch of 3 inch x 22 inch strips.  I placed one strip of fabric right side up along the short end of the rectangle and then placed another strip right side down on top of the first rectangle.  I stitched along the long end of the rectangle with a 1/4 inch seam and then pressed the two strips open, being careful not to touch the iron to the adhesive on the fusible fleece.  I continued in this manner until I had a striped quilted piece down the length of the fusible fleece.  I trimmed the fleece to about 21 inches x 27 inches (my yoga mat is 24 inches wide). I neglected to take more photos along the way. Sorry.  

I just finished up a really cool Quilt as You Go (QAYG) quilt and am really happy with how that turned out. I'll be sure to show you that next.  Happy Sewing, Knitting, Crocheting.... whatever makes you happy!