Thursday, December 31, 2015

Drawstring Bag: Take 2 (sewing)


Another Drawstring Bag


After making a drawstring bag the other day, I wanted to make some changes to the construction of this bag.  I "boxed" (I don't know what else to call it!) the corners on this bag, thus eliminating some of the bulk of fabric at the bottom of the bag.  In the first bag (orange bag with quail and poppies), you fold the bottom of the bag in a certain manner to make the bottom of the bag have a square appearance, but don't cut away any of the fabric.  The bag is comprised of an outer layer of fabric, batting, and inner lining fabric, and to me... there was just too much bulk in the bottom of the bag.  You can see the bottom of both of the bags below to see the difference. I am much happier with the bottom of the bag in the second bag (with the mice).


I have never tried to make corners on bags like this before so it's been interesting to see the various techniques.  To make the mice bag have a nice square bottom like it does, I used a technique I learned when I made the Market Bag earlier this week (see polka dot bag below).  I did make a third bag this week without any batting. I really like how it turned out as well.  I'll post about that another day.  I'll have to take some photos of the process I am using to make the corners so nice and tidy since I am lacking the vocabulary to describe it well. 


Wednesday, December 30, 2015

Drawstring Bag #1 (sewing)


That Drawstring Bag


I have been eyeing drawstring bags for awhile and finally tried to make one. I watched a video tutorial on line for this project. The pattern is called "That Drawstring Bag" and the patten is available for purchase on a blog called www.gourmetquilter.com. 


The bag has a nicely squared off, boxy bottom. The bag is lined with an ecru colored fabric with a subtle swirl design (I neglected to take a photo of the bag's interior) and there is a layer of lightweight batting in between the layers of fabric. There are casings top stitched to the bag two inches down from the top so that drawstrings can be inserted. I used some cotton twine for drawstrings but I would like to get some nicer looking cording. Finally, there are fabric pull tabs on the ends of the drawstrings. Those pesky, tiny pull tabs were the most difficult part of the pattern. I am not accustomed to sewing tiny little things!

I've made two more drawstrings bags since I completed this one. I will share photos soon!

Monday, December 28, 2015

Building Blocks: Block #6


Block #6

I have had this done for a really long time but just now took the time to block and photograph it. This was an enjoyable knit as I recall but I scarcely remember knitting it. My Etsy shop had me hopping for the past several weeks. In this block, there are interesting looking columns of diagonal stitches in the left, center, and right of the block. They appear to be some sort of cable but they are twisted stitches. No cable needle necessary! 


Saturday, December 26, 2015

Oven Mitt (sewing)


An Oven Mitt

I tried another sewing pattern in my "One Yard Wonders" book. I used fabric from my mom's fabric stash again. Thanks Mom!  I started making this project on my Pfaff. I've determined that my Pfaff really needs a cleaning and servicing so I pulled out my back up machine (my Babylock machine called "Molly") and it worked like a dream. 


I bought the Babylock machine last year when I was afraid I had broken my Pfaff right at the beginning of my Etsy Christmas rush.  Turns out my Pfaff was fine so I've not used the Babylock that much.

I pulled out the Babylock manual yesterday and kicked myself for not exploring it sooner. It's very user friendly. There is a page for each stitch and it specifies what foot you should use, what stitch length, what stitch width you should use, etc. Excellent!  I was especially excited to discover a special foot for a stitch which makes a really nice overlock stitch on raw edges, much like a  serger. 


In the manual, I found that I have a quilting guide. See how there is a metal guide to the right of the foot so I can make evenly spaced lines of quilting? It was perfect for quilting the oven mitt. 

Thursday, December 24, 2015

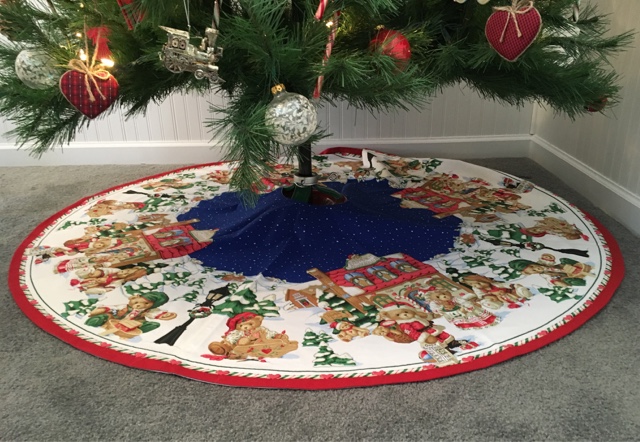
Christmas Tree Skirt #3


Christmas Tree Skirt #3

I was looking at my sewing projects here on this blog and it occurred to me that I never posted photos of this tree skirt. This was one of three skirts I made with preprinted panels from my mom. Thanks Mom!


This one is lined with white fabric. 


Here are the other two tree skirts (I posted about them last year!)


Above: Christmas Tree Skirt #1 (this one is lined with red fabric). 


Above: Chrismas Tree Skirt #2 (This one is lined with dark navy blue fabric. I let Zach pick which one we should keep for our tree and he picked this one).  

Wednesday, December 23, 2015

Miniature Stocking Garland (sewing)


It's Christas Eve. I made a little garland. I saw these sweet little stockings on Craftsy. The pattern is free and is actually for an Advent Calendar. You can find theTutorial here:


I decided to make just a few stockings. 


I made these assembly line style. I made each stocking different by carefully cutting out the front of each of the five stockings. I wish I would have had some thin ribbon but instead I used some cotton string to string them all together. These were tricky to make since they are pretty small.  I had a hard time with the narrow hem around the curves. It was also really tricky to turn them inside out. I lined each stocking with white broadcloth I have on hand for lining pillows. 

Here are some closeups so you can see each stocking. 


I guess I should add a photo to give a frame of reference for size. 


I hope you have a nice Christmas Eve. 


Nook Cozy (sewing)


A Nook Cozy

Since I retired on Halloween, I've been busy making pillows for my Etsy shop for the holiday season. The orders finally slowed down in mid-December and I've been enjoying sewing ANYTHING but pillows, and I am most definitely avoiding any project which requires stuffing. 

I've also been having time to read a bit more now that I am retired. Right now, I am reading "The Goldfinch" by Donna Tartt. It's a great book. Anyway, I decided to make a little cozy for my Nook. By the way, I really LOVE my little Nook. 


While I was at it, I made a little eyeglass case to match. 


I really like this fabric with blackbirds, butterflies, dragonflies, pink flowers, metallic gold swirl designs, and gray leaves. There are two quotes on the fabric:

"A bird doesn't sing because it has an answer.  It sings because it has a song."

"Spread your wings and let the bird in you fly."

Market Bag (sewing)


A Market Bag


After sewing so many dog bone pillows during November and December for my Etsy shop, I have enjoyed trying some new projects recently which do not requiring stuffing.  This Market Bag pattern is in the book "One Yard Wonders". 


I only really struggled with one aspect of this project. After you get the bag all sewn together, you do some top stitching at the bag's edges to give the bag more structure. Without the top stitching, the bag's sides would not be distinct from the bag's front and back panels.  First you top stitch down one side of the bag, pivot, then across the bottom of the bag, pivot, and then up the other side of the bag, all without cutting the thread or removing the bag from the machine. I could not successfully pivot without some of the fabric getting in the way.  If I make this again, I'll do the top stitching on the sides first and then the bottom. Also, the project calls for some sort if special, sturdy interfacing to insert at the bottom of the bag. I had none so I left it out. 

Making projects with larger panels of fabric makes me realize I could really use a larger ruler to use with my rotary cutter and self-healing cutting mats. If you are not sure what I am talking about, it's like   cutting fabric with a razor sharp pizza cutter.  The mats are a special material which does not get damaged by the cutting.  Thankfully I got a nice JoAnn's Store gift card for Christmas so I know just what to get.  Thanks Mom and Dad!

Sunday, December 20, 2015

A Few Dishcloths


I modeled my latest projects on Brutus. He's so comfy here on my lap and I am too lazy to get up to take photos.  I've been on a dishcloth kick lately. It's nice to have a little time to knit.  I actually got three cloths from one ball of cotton yarn and have a bit more leftover. 


Thanks for being a good model Brutus!

Sunday, December 6, 2015

A hat named "Pete"


Susan B. Anderson published a new hat pattern this week. The pattern is called "Pete".  You can see it in the photo above and you can read more about it here:


The pattern calls for holding two strands of sock weight yarn together. It got me to thinking of the sock yarn in my stash. Instead of making a striped hat as prescribed in the hat pattern, I decided  to use a solid yarn and a self-striping yarn together for the entire hat sans stripes. 


I had a lazy day today, lounging with the puppies and working on this hat.  Yes, I am wearing hot pink pajamas with penguins on them. I think the hat looks good. The solid yarn is Knit Picks Stroll in Sapphire Heather and the colorful yarn is Regia Design Line Random Stripe by Kaffe Fassett. This hat pattern is sized for a man but I am already imaging other sock yarn I have and am trying to figure out how many stitches I'll want to cast in for a hat to fit me. 


Friday, December 4, 2015

Buzz Lightyear Socks


Whoops, I wrote this at Thanksgiving but did not post it. Zach came home from college and took one look at my knitting. 

He said, "So I see you're making Buzz Lightyear socks!"

Huh?!?!?!?


Well, look at that!  He's right!  The resemblance is uncanny, don't you think?


Here's the yarn label. The color is 04 (Iris).  I'll be done with these socks soon hopefully. 

I finished these socks today. Here they are.